

To make a mind map, write your topic in the middle of a page, dump every related idea around it in short keywords, group those ideas into a few main branches, connect related points, then review the map and decide what to do with it. That is the whole method. The rest of this guide shows how to do each step well, with a worked example, the mistakes that make maps messy, and a way to turn the finished map into tasks you will actually finish.
TL;DR
- Start with one central topic in the middle of a landscape page, then brainstorm freely before you organize anything.
- Group ideas into roughly four to seven main branches and label each with one or two words.
- Use keywords, not sentences, and add cross-links between branches to show how ideas relate.
- Review the map for gaps and clutter, then turn the branches into dated tasks. A map you never act on is just a nice drawing.
Table of Contents
- What a mind map is and when it helps
- The mind map steps, one by one
- The same steps as a quick reference
- A second example: planning a group project
- Common mistakes that make mind maps useless
- From mind map to action
- Paper or digital?
- Our perspective
- Turn your map into a plan with Optio
- FAQ
- Sources
What a mind map is and when it helps
A mind map is a diagram that puts one topic at the center and spreads related ideas outward in branches. Unlike an outline, it is not strictly linear. You can see the whole subject on one page, and you can jump between branches as your thinking moves.
That makes it useful in a few situations you probably already face:
- Starting an essay or paper, when you have a topic but no structure.
- Studying for an exam, when you need to see how chapters connect instead of rereading them in order.
- Planning a group project, when everyone has ideas and nobody has a plan.
- Planning your own week, a job search or a side project, when the problem is too many loose pieces.
The University of South Carolina’s facilitation guidance on mind mapping also suggests keeping the map as a reference during discussions and planning, then sharing it with the team. That detail matters later, when we get to what happens after you draw.
The mind map steps, one by one
Different guides count the steps differently. Some say three, some five, some seven. They describe the same flow: generate, organize, connect, refine. Here it is in seven steps, which is the most useful level of detail for a beginner.
Step 1: Set up your page
Grab a blank sheet of paper, a whiteboard or a blank digital canvas. If you are working on paper, turn it sideways. RMIT University’s Learning Lab recommends a landscape page because the horizontal format leaves more room for ideas and branches.
Use at least two pen colors if you have them. You will want them in step 5.
Step 2: Write the central topic in the middle
Write the subject or project in the center and circle it. This is the anchor everything else hangs from, so choose it with care. The topic should be broad enough to hold everything you want to explore, but specific enough to give the map a focus.
Compare these two:
- Too broad: “History”
- Too narrow: “Date of the Treaty of Versailles”
- Workable: “Causes of World War II”
If you are mapping a project, name the outcome, not the activity. “Launch club website by March” gives you more to work with than “Website.” A small image or a bold shape around the center word also helps your eye find the anchor quickly when the map fills up.
Step 3: Brainstorm without organizing
This is the step most people get wrong. Before you build any structure, write down everything that comes to mind about the topic. RMIT’s guidance is to brainstorm freely first: write everything relevant, hold off on organizing during the initial idea-generation stage, and use keywords or short phrases.
Set a timer for five to ten minutes. Scatter words around the center in any order. Do not stop to decide where something belongs, and do not delete anything. Editing now slows you down and kills the odd ideas that often turn out to be the best ones.
For the World War II example, your scatter might include: treaty terms, inflation, unemployment, appeasement, propaganda, rearmament, League of Nations, nationalism, economic crisis, alliances.
Step 4: Group ideas into main branches
Now organize. Look at your scatter and find the natural categories. RMIT suggests identifying or circling major categories, then connecting subordinate points to them.
Draw a thick line from the center to each main branch and label it with one word that describes the theme. The University of Nottingham’s study skills factsheet on mind maps recommends no more than seven main branches, each labeled with a word describing the theme.
In our example, the categories might be Economic, Political, Diplomatic and Ideological. Then each scattered keyword moves onto the branch where it fits:
- Economic: inflation, unemployment, economic crisis
- Political: nationalism, rearmament, propaganda
- Diplomatic: appeasement, alliances, League of Nations
- Treaty terms might sit under Diplomatic, or become its own branch if you have enough to say about it.
If a branch ends up with only one item, fold it into a neighbor. If one branch is swollen, split it in two.
Step 5: Add sub-branches and use color
Extend each main branch with thinner sub-branches for deeper detail. MindTools describes this as adding deeper levels linked to the relevant subheadings, and repeating as needed. Two or three levels is usually enough. Past that, the branch probably deserves its own separate map.
Then add color. RMIT recommends using colors or visuals to clarify categories. Give each main branch its own color and keep every sub-branch in that color. When you glance at the map a week later, you will see the structure before you read a single word.
Step 6: Connect related ideas across branches
This is where a mind map becomes more than a tidy list. Draw dotted lines or arrows between ideas on different branches that affect each other. The Open University’s OpenLearn unit on mind maps explains that lines, arrows, colors and linking words can show relationships among ideas and key points once the free-association stage is done.
In the example, “unemployment” on the Economic branch connects to “propaganda” and “nationalism” on the Political branch, because economic hardship made extreme messages easier to sell. That link is the kind of thinking a good essay argument is built from. A plain outline would have buried it.
Write a two- or three-word label on the link if the relationship is not obvious, such as “fuels” or “caused by.”
Step 7: Review, refine and use it
Step back and read the map as a stranger would. Ask:
- Is anything missing that I know belongs here?
- Are there branches that repeat each other?
- Is any detail too minor to deserve space?
- Would redrawing a branch make the grouping clearer?
MindTools also notes that you can add new information or tasks later in the appropriate place, so the map can evolve instead of being frozen after the first draft. If your map is messy after the review, redraw it clean. That second pass is a good study session in its own right, because you have to think about every connection again.
The same steps as a quick reference
| Step | What you do | Time | Watch out for |
|---|---|---|---|
| 1. Set up | Landscape page, two or more colors | 1 min | Starting on a small notebook page |
| 2. Center | Write and circle the topic | 2 min | Topic too broad or too narrow |
| 3. Brainstorm | Scatter keywords, no sorting | 5 to 10 min | Editing while you generate |
| 4. Branch | Group into 4 to 7 labeled categories | 5 min | Too many main branches |
| 5. Sub-branch | Add detail, color-code | 5 to 10 min | Going more than three levels deep |
| 6. Connect | Cross-link related ideas | 3 min | Skipping this and ending up with a list |
| 7. Review | Check gaps and clutter, redraw if needed | 5 min | Never looking at the map again |
A second example: planning a group project
Mind maps are not only for essays. Say your four-person marketing class has to deliver a campaign presentation in three weeks.
Center: Campaign presentation.
Brainstorm: research, slides, speaker order, client brief, budget, survey, deadline, rehearsal, visuals, who owns what, meeting times, sources.
Main branches: Research, Content, Delivery, Team. Under Team you might place “who owns what” and “meeting times.” Under Delivery: “rehearsal” and “speaker order.” A cross-link from “survey” under Research to “slides” under Content reminds you that the survey results must be in before the slides can be finished.
The map has done its job when the group can look at it and agree on who does what. The University of South Carolina’s guidance lists a collaborative sequence that ends with reviewing, finalizing, then using or sharing the map. Photograph it or save it where everyone can see it, and treat it as the starting point for your task list.
Common mistakes that make mind maps useless
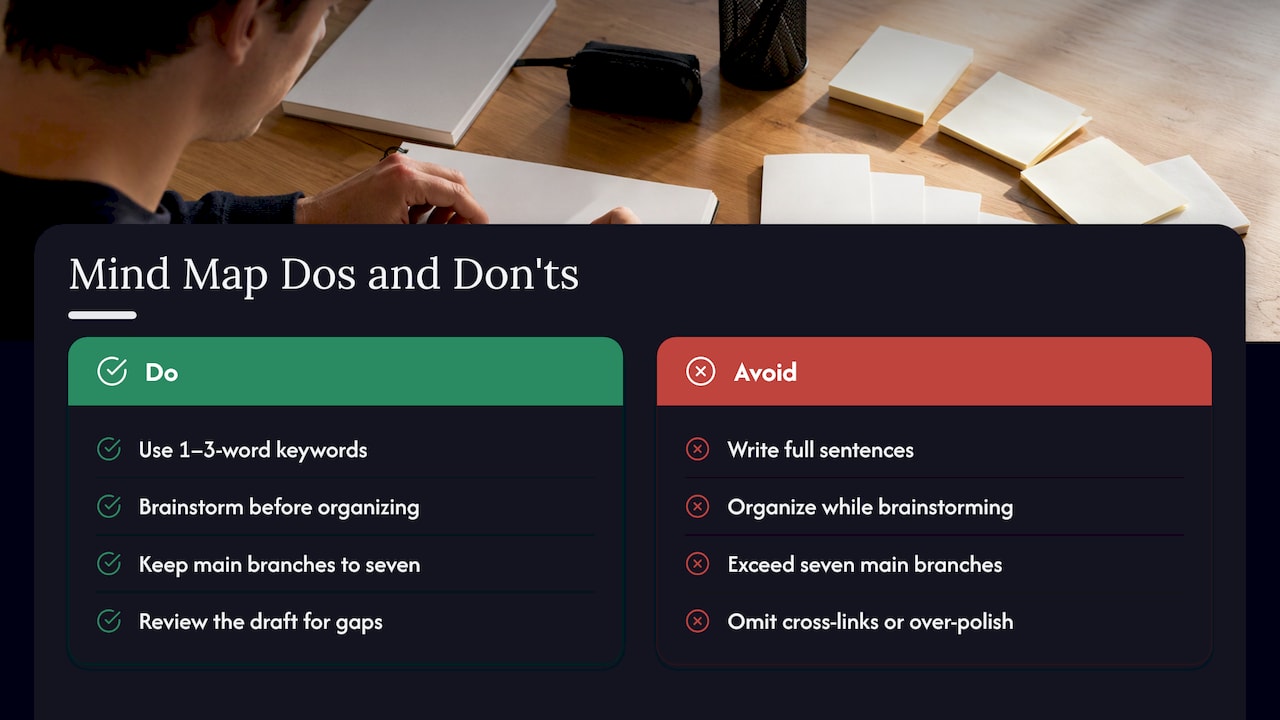
Writing sentences instead of keywords. Long phrases crowd the page and are hard to rearrange. One to three words per branch is the goal, which both RMIT and MindTools advise.
Organizing while brainstorming. If you stop to decide where each idea goes, you will generate fewer ideas and lose the surprising ones. Separate the two phases.
Too many main branches. More than seven and the map stops being a summary. Nottingham’s guidance caps main branches at seven for this reason.
No cross-links. Without connections, you have drawn a list with extra steps.
Perfecting the look. A mind map is a thinking tool. If the lines are wobbly and the colors are inconsistent, it still works as long as you can read it and use it.
Never reviewing. The first draft almost always has redundant branches and a missing area. A five-minute review pass is where the map earns its keep.
From mind map to action
The biggest gap in most mind map tutorials is the last step. You finish a beautiful map, close the notebook, and nothing changes. A mind map shows you what is in your head. It does not tell you what to do first.
Here is a simple way to bridge that gap:
- Circle the branches that need action. Not every branch does. Some are just background knowledge.
- Turn each circled sub-branch into a task that starts with a verb: “Write intro paragraph,” not “Intro.”
- Rank the tasks. Our guide to how to prioritize assignments walks through a way to decide what goes first when everything feels urgent.
- Put the tasks on your calendar. If you are fitting them around classes, a clear study schedule keeps the plan realistic.
- Break big tasks into small ones. Micro-tasking helps when a branch like “Research” is too large to start.
If you are still deciding where mind maps fit among your note-taking habits, our pieces on ways to organize notes and why use note-taking apps compare options. And if you wonder whether dedicated mapping software is worth it, we cover when a daily app fits better.
Paper or digital?
Both work, and the steps do not change. Paper is fast, forgiving and free of distractions, which suits the brainstorming stage. Digital maps are easier to rearrange and share, which suits the review and collaboration stages. Many people sketch on paper first, then redraw a clean version on a screen.
Adobe’s guidance that comes up in many how-to articles suggests photographing or exporting a finished map for later reference. Whatever your format, do that. A phone photo of a whiteboard, stored with your other notes for the course or project, is enough.
Our perspective
We built Optio around a simple belief: ideas are cheap, and follow-through is what counts. Mind maps are one of the best tools we know for the messy start of a project. They get everything out of your head and onto a page.
But we hear the same story from students and young professionals again and again. The map looks great, and then the week gets busy. The branches never become tasks, the tasks never get a time, and the project drifts.
That is why we think of the mind map as step zero. The real work begins when you pull the action items off it and give each one a priority, a color for the part of life it belongs to, and a reminder. Optio is designed to be the second-in-command that keeps that plan moving, so you, the Centurion, can stay focused on the work itself.
We are an indie-built app and we shape it with feedback from our community. If you map your ideas first and then bring them to Optio, we would love to hear how that workflow feels.
Optiostation
Turn your map into a plan with Optio
Once your mind map is done, the next job is moving its branches into a system you check every day. Optio is a mobile app for task, team and time management built for college students and young professionals. You can organize projects, color-code different areas of your life, set smart reminders, track time and sync with Google Calendar.
Try carrying your mind map’s action branches into Optio’s Prioritization Station and see how each branch looks as a ranked list. If you want to compare approaches first, our overview of task management software is a good place to start.
FAQ
What are the steps of mind mapping?
The core steps are: write a central topic in the middle of the page, brainstorm related ideas freely, group them into main branches, add sub-branches, connect related ideas across branches, and review the map. Some guides compress this to three or five steps, but they cover the same flow of generating ideas, organizing them and refining the result.
How many branches should a mind map have?
Aim for about four to seven main branches. The University of Nottingham’s study skills factsheet recommends no more than seven. If you have more categories than that, look for ones you can merge, or split the topic into two maps.
Should I write words or sentences on a mind map?
Use keywords or short phrases. They are quicker to write, easier to scan and simpler to move around when you reorganize. Save full sentences for the essay, presentation or notes you build from the map.
How do I mind map for studying?
Put the course unit or exam topic in the center, make each main branch a major theme from your notes, and add key terms and examples as sub-branches. Then draw cross-links between themes that depend on each other. Redrawing the map from memory a few days later is a good way to test what you actually remember.
What should I do with a mind map when it is finished?
Use it. Keep it visible while you plan, share it with teammates if it is a group project, and convert the action branches into tasks with deadlines. The map is the starting point, not the finish line.
Sources
- How to create a mind map, Learning Lab, RMIT University
- Mind Maps, University of Nottingham study skills factsheet
- Succeeding in postgraduate study: Mind maps, OpenLearn, The Open University
- Mind Mapping, Organizational Excellence, University of South Carolina
- Mind Maps, MindTools
